Saturday 28 June 2014

Jo: The Burda Birthday Dress


As of next week I will be a quarter of a century old (as I keep being reminded by my lovely fiancé). I will be celebrating the same way I do most years, which is going to my local, drinking too much wine and probably ending up in either a swanky cocktail bar or a dodgy rock club. Unfortunately my lovely Sew It Yourself ladies won't be able to join me.

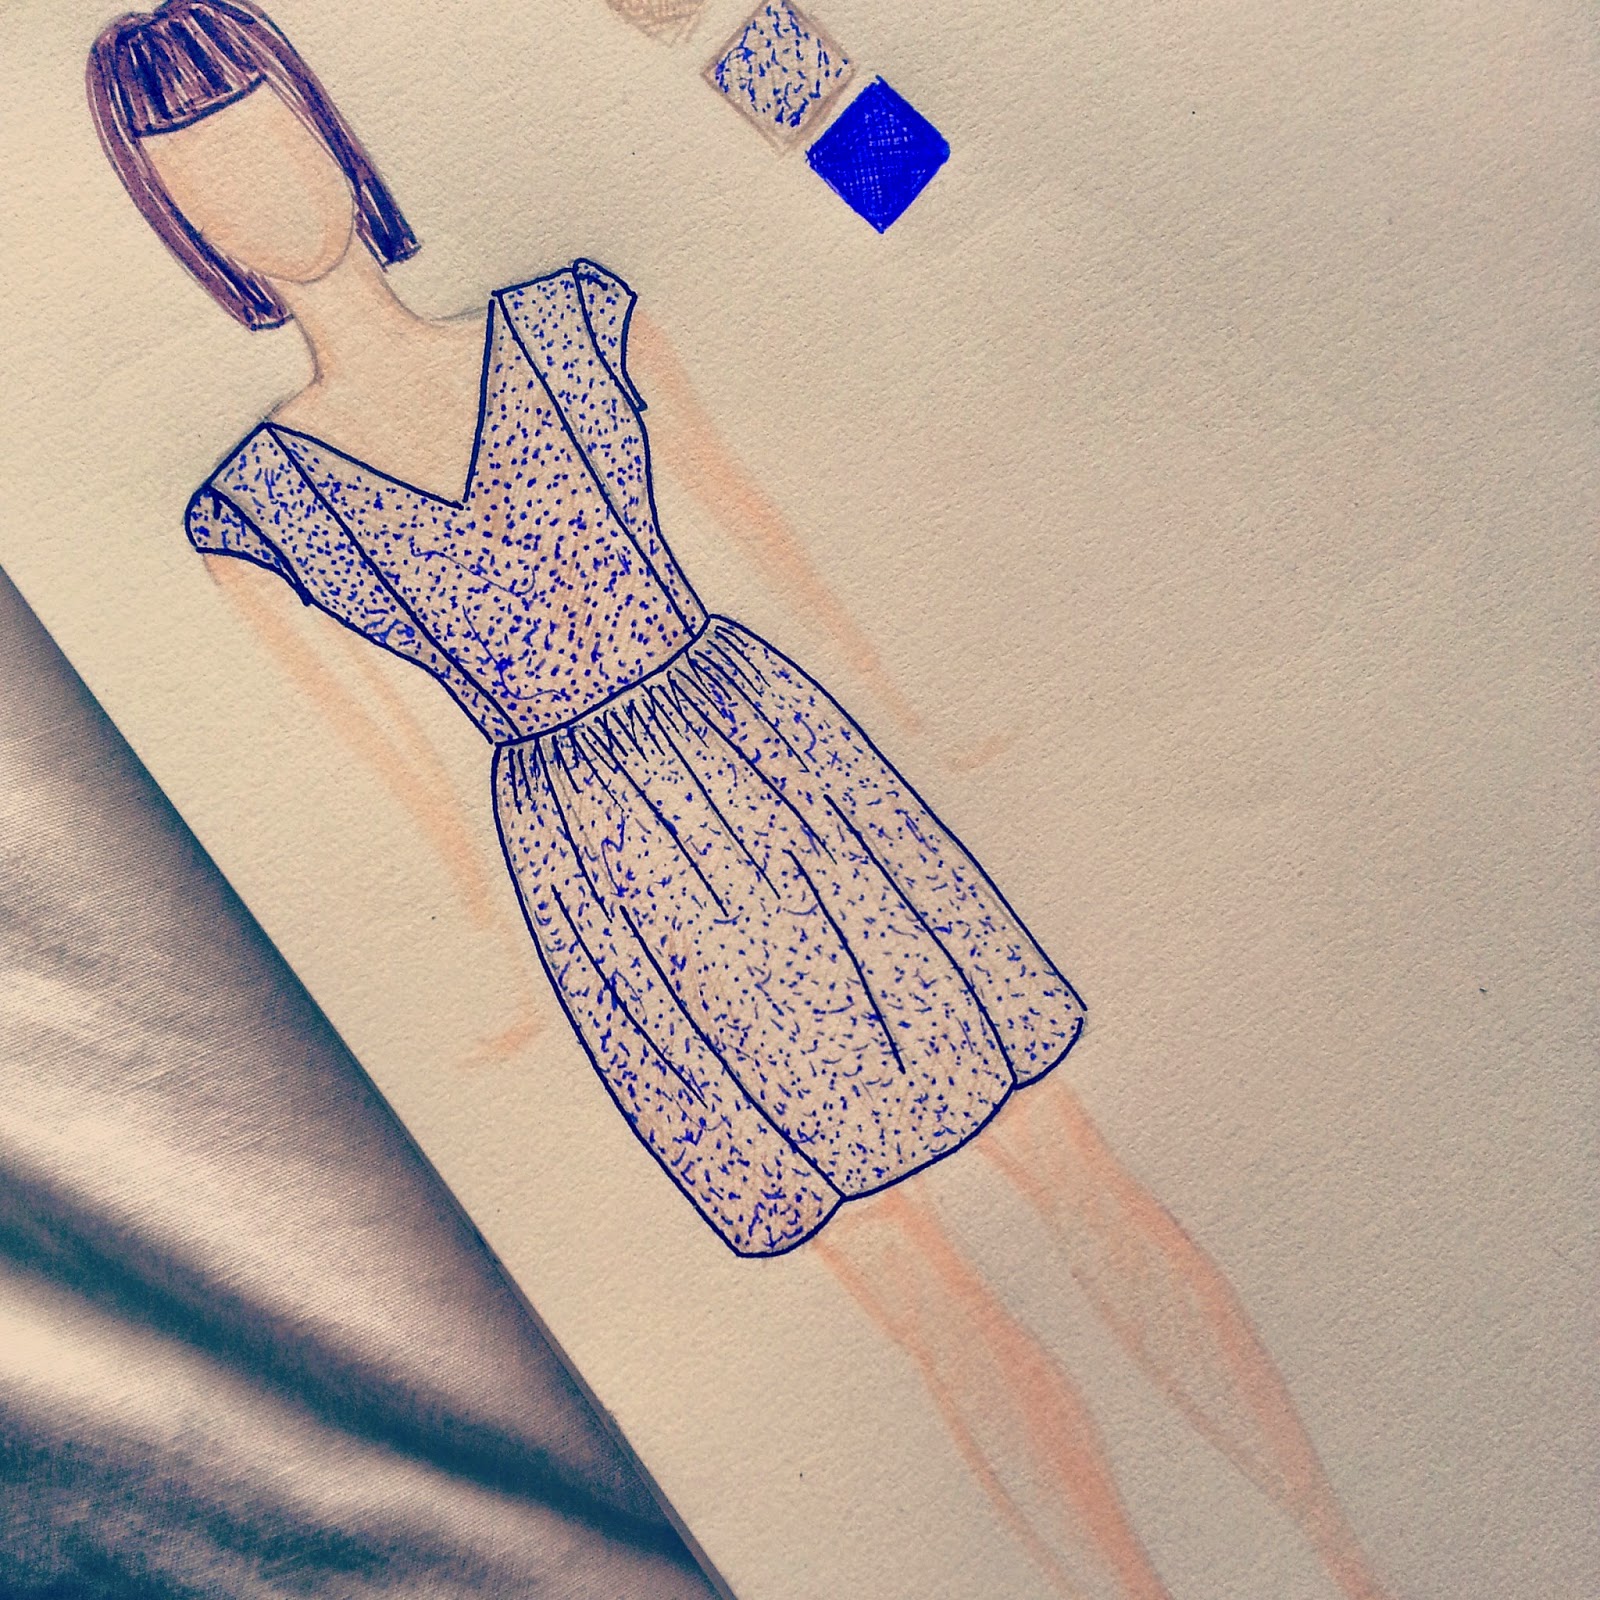
Now along with many other fashion lovers, my worst nightmare is being seen in the same outfit as someone else. Perfect excuse for a new challenge dress!

I had recently purchased Burda Style UK magazine and decided on a mini-dress. I already had my fabric from a previous shopping trip to my favourite Birmingham fabric shop Barry’s Fabric Superstore.


I traced out the pattern I needed, following the instructions. This seemed to be the longest process, but once you get used to looking for the same colour and playing spot the number, it kind of becomes like a grown up version of dot-to-dot.           

Instead of using my normal pattern paper, which is a bit thicker, I decided to use tracing paper (a roll of grease proof/baking paper), as it was easier to see through to trace. The Burda pattern has pockets and is supposed to have lining, however, I have chosen not to have pockets or lining. This is because I am going to leave my dress shear and wear a basic slip dress underneath (that I borrowed from another dress). This way I can change the image of the dress dependant on my mood with which bass colour I put underneath it.


Chiffon involves a lot of pining!!!Don’t try and cut corners and not pin, as it will not work and you will end up wanting to scream, so just use pins!!!! All is cut and ready to sew


Now the construction begins, and I was very good and started off following Burda's instructions word for word, until I got bored at step 2 and decided to wing it as I do with most projects.

First step is the bust darts. Tack with bright thread so you know where to sew to. Pin and sew.


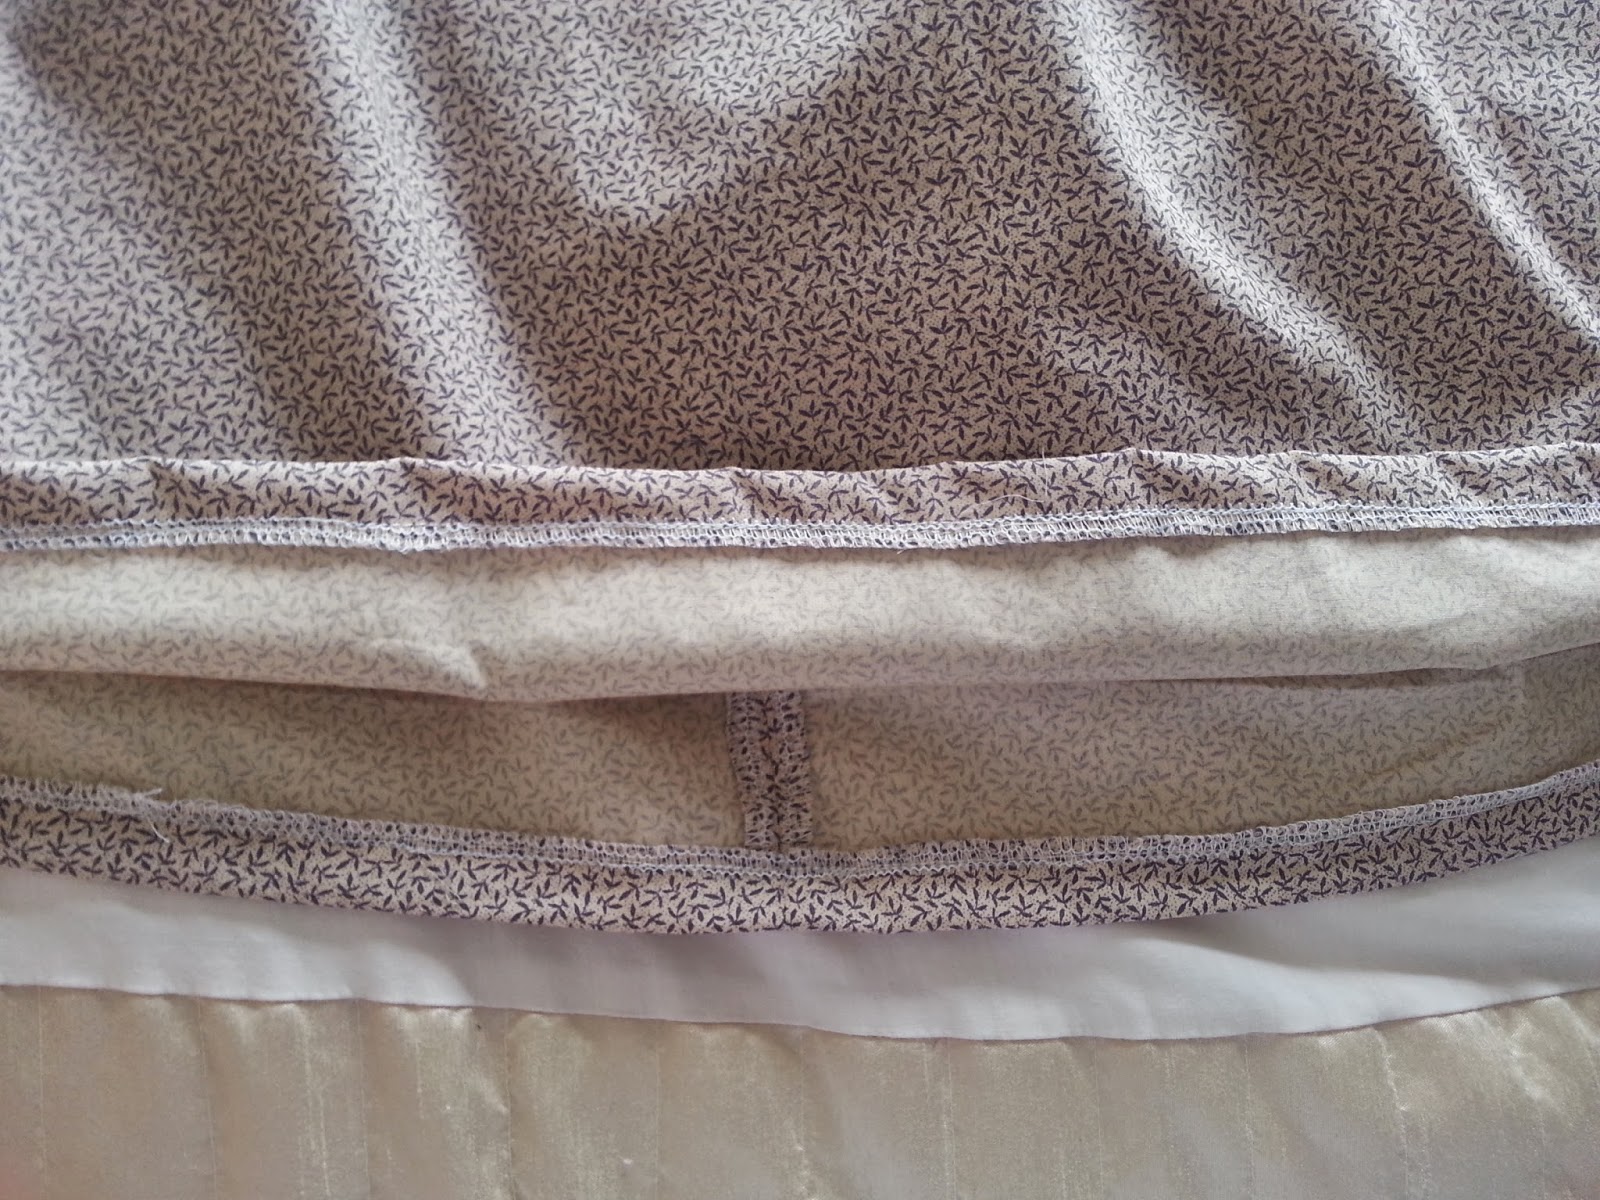
Then followed by the side seams. I pressed and over locked the seams and then added top stitching to give the dress a much neater finish and less chance of it fraying and coming apart with wear. 


The back centre seam was then sewn up until the point where the zip will begin. Seams were then over locked and pressed apart.

Next the zip. Now I hate putting in zips, with a passion. I’m not very good at them no matter how hard I try. I’m looking down at this very fragile chiffon, seeing the edges fray away and thinking that I only have one shot at this. I can’t risk un­picking and ruining the fabric. My next fear was that I didn’t have a white zip, but I did have a reddish/orange zip that matched perfectly with the flecks of orange in the fabric.

I had an idea (which is often dangerous) to not have an invisible zip, but to add a pop of colour. So I did it and to my amazement it worked first time! 


My next pet peeve are sleeves.

The sleeves where based on a two­piece sleeve block so they were lined up, pinned, and sewn together. The seams where then over locked and pressed.

When inserting them into the armholes, as per usual I find myself not being able to fit them properly, so I improvised. I added 4 small pleats to each shoulder. The results where very pleasing and I also like the fact it added a bit of shoulder, as I have none. 


And then finally the finishing touches, hemming a good press! I am very happy with the results to this dress and I can not wait to wear it out. I think it's flattering yet comfortable and sexy yet modest.

The fabric is light and perfect for summer. The only thing that I may alter in the future is the neckline as it fits fine but may be a tad snug. I have also made the back slightly longer than the front, to prevent any flashing occurring.

I love this dress and now it's time to go out and celebrate! 


Sunday 22 June 2014

Bridie: My Vintage Shirt Dress


So for my second dress of the challenge I decided to buy a pattern instead of make one myself. This was purely a time factor if I'm honest, little man is sleeping well these days but I still only have at the most four hours a night, before exhaustion sets to work on any projects I have. I called this time my stitching hour (a play on witching hour because its magical).

The pattern I chose was this lovely vintage style shirt dress by Burda from Minerva Crafts. I fell in love with it, vintage is always a win with me plus it looked casual enough to wear to the shops and would be nice to wear in this heat we're having. I went through my fabrics looking for the perfect match and found this pretty plaid vintage fabric another of the many pieces I inherited from my grandma. The colours in it are those of strawberry bonbons, sherbet lemons and parma violets yum. I should really call it my sweet shop dress.    


When I got my pattern I decided to read through it a couple of times because its been quiet awhile since I last made anything with a collar. All I had was a vague memory of it being fiddly and required a lot of unpicking. I thought I'd play it safe and make a toile. Which would help me remember how to do it and then my finished collar would be perfect. My plan well and truly back fired. Instead of my toile helping me gain more confidence for my final piece, it actually made me want to pull my hair out!     


This is my sorry attempt at my toile, shocking I know! In the end I just thought sod this I'm making dress. I'm so glad I did and didn't give up because it was so much easier using the fabric I'd chosen. I think my toile fabric was too thick.


Needless to say I took my time with the real thing, reading and re reading each step. omparing it to the diagrams to make sure I was getting it right.


So far so good!


This bit was tricky if I didn't get it right there would be a hole where the back collar and front met. It took a couple of attempts but I eventually got it. Could of done with a glass of wine at that point to celebrate but had none in. Sad times. 


The rest of the dress went well. I didn't have any trouble with the pleats and the sleeves were simple enough. I thought I was on the home stretch at this point, once again I was wrong! You wouldn't think button holes would be that tricky but this was the first time I'd made button holes using Fred (my machine). I had no idea that stitch to use what length or anything. It wasn't until I remembered there was a is a secret panel above the foot compartment that I started to get some where. When I found the switch and revealed the panel it felt like there should of been a beam of light and a choir singing. Not that I like to be dramatic or anything! 


It had all the information I needed in a handy little chart. My Fred is good to me!


Things got scary at this point I set Fred to the right stitch, length and needle position and started to practice my button holes. Oh my I have never heard such painful clunking noises coming from her. All I could do was pray to the sewing machine gods that this was meant to happen. Thankfully no machines were harmed in the making of this dress!


After many attempts I finally got the hang of it!


Eventually I took the plunge and made my finished button holes which thankfully went well.


I went through my button stash for something suitable and found some nice purple buttons which I had more then enough of. I would of preferred it if they were lighter. 


Although after adding them I quiet like the finished look!


This is the finished dress I'm really happy with it and think I did really well with my pattern matching.  It's a little off at the back but didn't realise until it was too late. It's not too noticeable so shhh our secret! 


This is me wearing it. I styled it with a lovely blue belt and teal shoes which surprisingly works! I love the way it looks and it feels great on I will definitely be making it again!


Friday 20 June 2014

Bridie: Joining The White Tree Team

So a few weeks ago a new follower popped up on my Twitter. I had a peek at their page and was very intrigued by them, it was a online fabric shop I'd never heard of before. This doesn't happen very often as I have a serious fabric addiction and spend many a night looking at fabric online, then inevitably dreaming about fabric. This new follower was White Tree Fabrics.

I sent a tweet saying thank you for following and got a reply back saying they were looking for sewing bloggers to join their blogging team and were we interested. Well this was exciting! I quickly got in touch with the girls and explained it to them about White Tree getting in touch, this took a few attempts as its not easy to do while excitedly typing on Facebook. The girls of course were just as thrilled as I was especially after looking at the website. You seriously need a few hours and a cup of tea to take everything in, there are so many beautiful fabrics on there! So I got back in touch and I'm very happy to say we are now members of the White Tree blogging team.

So the girls and myself have been searching through their website getting inspiration and ideas for our first White Tree projects. Believe me it took a while I wasn't kidding about the size of the website! I was amazed at the selection, jersey, chiffon, satin, stunning lace I could go on. There are over 500 sewing patterns to so we had a lot of options!

Just a few of their stunning fabrics doesn't really do it justice just how many fabrics they have to choose from. Ditsy chiffon, warm jersey and just one of the many laces they have to offer.

Here's a peek at my 1st White Tree project I have planned. I'm making posh PJs in peach and ivory crepe back satin. Very excited the pyjamas I've owned are usually flannel and shrink in the wash not a great look!


So excited to start sewing them!

White Tree have also very kindly set us up with a discount code for our lovely readers. It's for 20% off and free post and packaging. The code is SIY Challenge. We'll include it at the end of all our White Tree posts as well as links to the fabrics and patterns we use. 


Happy Sewing.


Saturday 7 June 2014

Laura: Cotton Summer Dress

This dress is made from a lovely soft cotton which I bought from Doncaster market when this challenge started. It’s quite a rigid fabric so I was struggling with the thought of making a dress out of it as I usually like my dresses flowing. Non the less I decided to ignore my instincts and I designed fitted bodice dress with a gathered waist skirt.


(not my best illustration, but it gets the idea across)

The pattern was a mixture of different patterns I already had made up.

The top was a simple bodice with the bust darts joined so they became a seam and the neckline cut into a V. The cute cap sleeves with a pleat in them and gathered skirt I used on my First dress of the challenge.

The cutting out
When I bought the fabric it wasn’t folded, so I pressed the fabric and folded it in half, along the length to create a fold line. I laid the pattern pieces on the fabric, the front panel of the skirt and the front bodice were laid on the fold line and the rest fit in around following the grain. (TIP: following the grain line of the fabric prevents the fabric twisting and warping when you sew the pieces together)


After the pieces were cut out I cut notches where the bust darts were going to be and chalked on the bust point (TIP: This is so that when I remove the pattern from the fabric I don’t lose where the dart is meant to be. I have done this plenty of times and then had to pin the pattern back to the fabric. VERY ANNOYING and time wasting)

The cap sleeves with a pleat


The gathered waist line


 (TIP: To easily gather, sew 2 long stitched lines 1 centimetre apart along the length pull the threads a bit on one end and tie in a knot. On the other side pull the threads as much as you want it gathering and even out the gathers out with your finger tips)


The zip


(TIP: over lock the fabric where the zip is going to sit before you sew in the zip)

The neckline

I over locked the neckline, then folded it over and stitched it in place.

Darts on the back 


This helps the dress have a closer fit

(TIP: Make sure all the edges are nice and neat inside as you sew.  Using an over locker saves me so much time)


The Hem


The hem was then over locked, folded and pressed over then stitched in place. nice and simple

The final dress